| |
|
FIVE MORE EXERCISES
TO PROTECT YOU FROM "LAPTOP REVENGE" |
By John Pint In 2012, a casual conversation with Guadalajara yoga master Paul King alerted me to the fact that vast numbers of people—myself included—are inviting dire consequences in the future by spending years working at a laptop with poor posture. King told me that the typical laptop user’s position, hunched over the keyboard, is damaging for the back, neck and lumbar, but he then showed me four short and simple exercises I could do during the course of the day while seated on my chair or standing behind it, to counteract the harmful effects of this bad posture upon my spine. These exercises, which take only a minute and a half to do, were described in “How to enjoy your laptop and stay healthy”. More recently I mentioned to King that I had been feeling either a pain or “pins and needles” in my left shoulder, at the base of my neck. This had persisted for some weeks and neither rest nor alternative treatments (homeopathy and acupuncture) seemed to help. As I operate my mouse with my left hand, he suggested the problem might be associated with the same nerve that causes Carpal Tunnel Syndrome. I hunted around on the internet and found a surprising number of reports by very unhappy people who had had CTS surgery only to end up a few years later with the same sort of shoulder-neck pain I was experiencing. King commented that this nerve runs all the way up the arm to the spine and operating on the wrist might not necessarily solve the problem. “If the wrist is not showing signs of discomfort then the cause of the problem may well have more to do with the hunched shoulders and collapsed chest. Before you seek more dramatic solutions I know some exercises that may help,” he told me. These, he said, are primarily used by freestyle swimmers who repetitively roll their shoulders inwards as part of the stroke action; a rotation that is not dissimilar to the shoulder position of a typist, or someone who is holding a steering wheel. In each of these situations the shoulder blades get pulled apart and tend to move up the back, the front of the shoulder is constricted and the chest muscles are contracted. All of this creates instability in both the shoulder blades and the shoulder joint, and a range of shoulder injuries may result. To avoid injury, swimmers use a set of simple exercises to counteract the repetitive stroke actions, and thereby release their upper back muscles, stretch their chest muscles, and strengthen the muscles that roll the shoulder outwards and those that draw the shoulder blades closer together. I should also point out that they only take 20 seconds each, so if you add them to the four ‘chair’ exercises I referred to earlier, you have a routine lasting only a few minutes, which you could practice every once in a while to give you a pleasant break from working on the computer.” 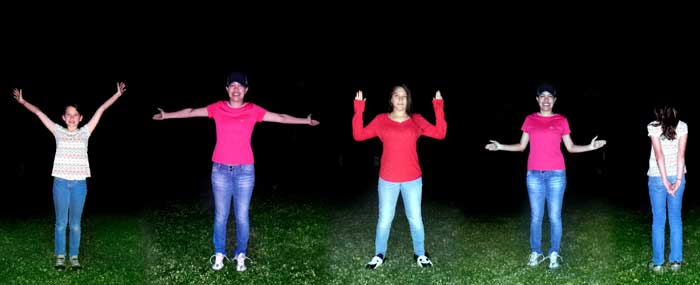 Five
simple exercises for combating the negative effects of using a laptop.
In these exercises, your arms are in positions that resemble the letters Y, T, H, L and V. The exercises can be done while you are standing, but Paul King suggests you start out by first doing them while lying on the floor, flat on your back. Bend your knees and place your feet closer to your buttocks with your lumbar (small of the back) firmly flush with the floor. Once you get into the exercises you will note that touching the back of each hand to the floor is easiest in the T position and most difficult in the L position. After you are used to how these exercises feel, and the position of the lumbar, you can do all of them standing up. Thus, you will keep your back straight, not arched, when doing the exercises on your feet. 1. Y: Raise your arms above your head to form a letter Y, palms facing forward. Fully straighten your elbows and really extend into the finger tips, but do not lift up your shoulder blades towards your ears. Instead release the upper back so that the shoulder blades descend. Hold for 20 seconds. 2. T: Now extend your arms out to the sides in line with your shoulders and palms facing forward. Extend from the centre of your chest out to the tips of your fingers; then draw the arms back so that the hands move behind the line of the shoulders and the shoulder blades are squeezed towards each other. Hold for 20 seconds. 3. H: From here bend your elbows so that the forearms are now vertical and the upper arms parallel to the floor. Do you feel like a giant H? Good! Slowly press the elbows and the hands back and squeeze your shoulder blades towards your spine. Hold for 20 seconds. 4. L: Now lower the upper arms until they are pointing straight down. Bend your elbows so the forearms are parallel to the floor. Each arm now looks like an L. Move the hands and wrists back, so that the front of the shoulders roll open and the chest spreads. Hold for 20 seconds and then release. 5. V: Finally, interlace your fingers behind your back and straighten your arms as you extend them towards the floor. Bring the heels of the hands to touch and then try to touch the elbows together. Again the outer shoulders roll back strongly, the chest spreads wide and the shoulder blades squeeze towards each other. Hold for 20 seconds and then change the interlacement of the fingers (so the other little finger is outermost); hold again for 20 seconds and then release. Regarding these exercises, Paul King comments: “Shoulder problems are common with swimmers and these are exercises they use to warm up and also to stretch after a workout. We do similar things in yoga but it tends to be a bit more involved. These five exercises are easy to remember and to do without supervision. Doing the exercises free standing is fine. Doing them on the floor or against a wall to start with gives you a reference point so that you know where you are in space. For example, you might think your elbows and wrists are back in line with your shoulders but when you stand against the wall you find out there is still some way to go. Once you have progressed and are familiar with the routine, the wall is less useful. The advantage of using the floor to start with is to protect the lower back, which you can keep flat on the floor by bending your knees. The tendency when working on the shoulders or upper back when standing is that we arch our back, throwing the lumbar forward and can easily and unwittingly cause compression in the lumbar vertebrae. Learning on the floor helps us get a handle on this before progressing to the wall, and then free.“ After working with these new exercises for a week I began to feel some noticeable relief, and within two weeks the tingling had gone. Slowly, over a period of two months, the pain in my neck diminished until, once again, I can look backward without discomfort. Since I continue to use my laptop regularly, the challenge is to stop every once in a while to do the four exercises mentioned at the beginning of this article and to do the YTHLV exercises at least twice a day. Paul King’s iYoga Studio is located at La Luna 2421 in Jardines del Bosque in Guadalajara. The telephone number is 333 122 3944. |